Setting up a professional account
Who this is for. Specialists and companies who want to receive requests on Zipo.
It covers everything from creating the account to a fully filled-in public page: services, coverage areas, an hourly rate, per-service prices, photos of your work, a QR code and notifications.
The screenshots show the Bulgarian interface — the screens are the same in English, only the labels differ.
1. Before you start
| You need | Why |
|---|---|
| A Bulgarian mobile number that can receive SMS | Professional accounts register by phone. Email alone will not create one. |
| About 10 minutes | The wizard is four steps; the price list and photos can be added later. |
| A photo of yourself, or your logo | Optional, but the catalog card and your public page look empty without it. |
| Your UIC/Bulstat, if you register as a company | Optional. Checksum-validated in the form. |
| Photos of finished work | Optional, up to 20. The strongest part of a public page. |
Everything is free. There are no fees, no commission and no credits — contacting a client costs nothing at launch.
2. Create the account
Where to start. All the entry points lead to the same place:
- “Become a pro” in the site header and in the mobile menu
- The sticky bar at the bottom of public pages
- The band under any specialist’s public page (“Become a specialist”)
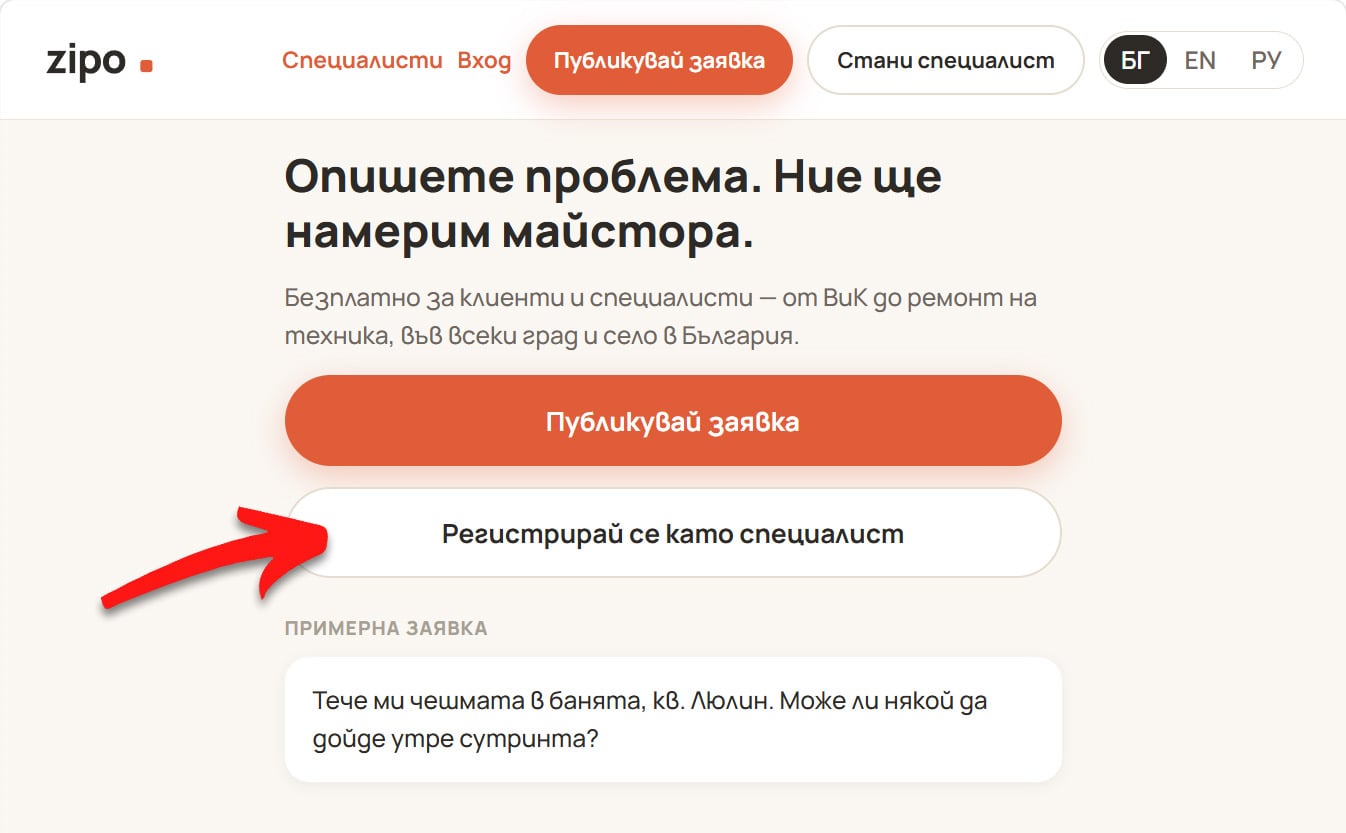
- Enter your phone number and press “Send code”.
- Enter the code from the SMS and press “Verify”.
- You land in the setup wizard.
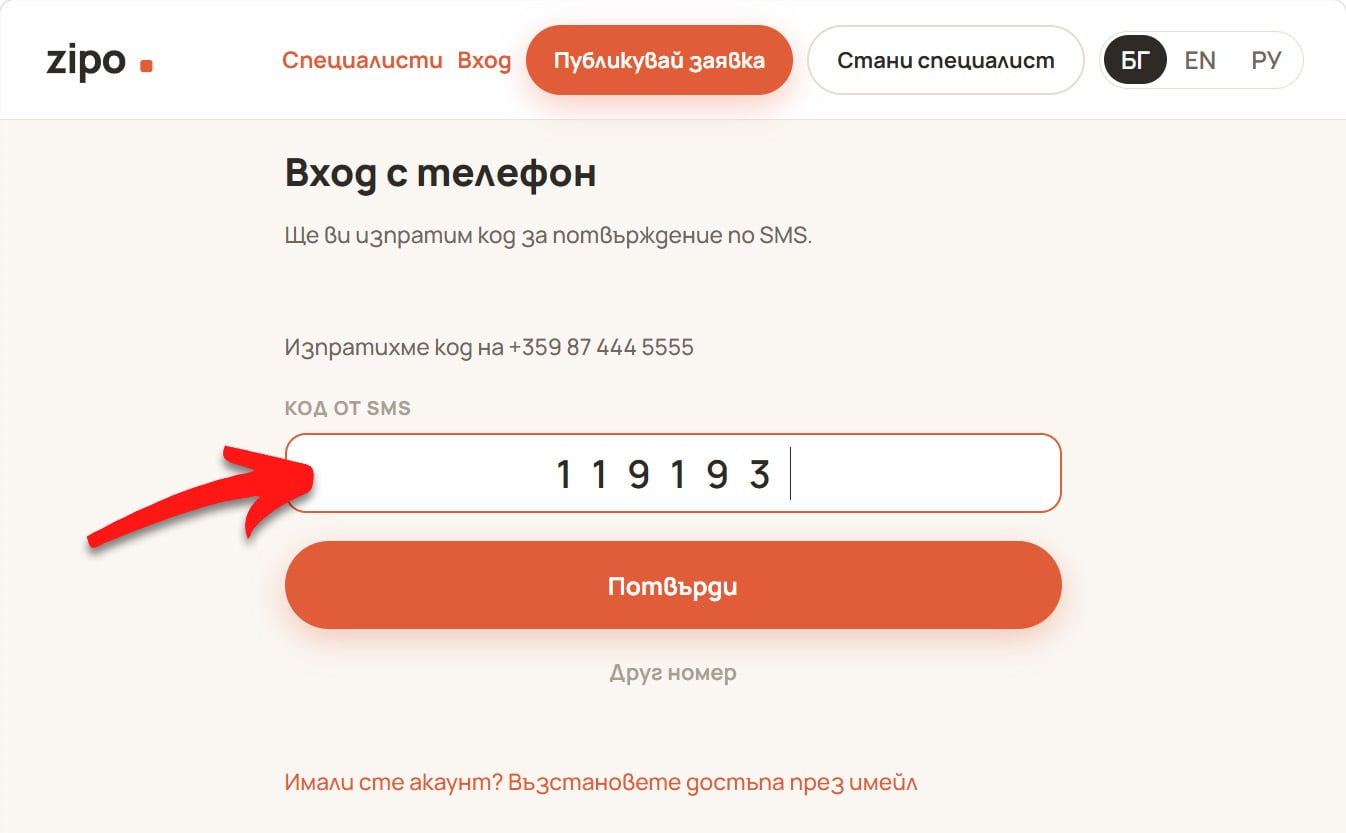
There are no passwords anywhere on Zipo — signing in is always a one-time code.
A few notes. Three things that save some confusion:
- Wrong tab. If you see the message below, you tried the email path. Use the phone tab.
- One number, two accounts. If you already use Zipo as a client with the same number, that is fine: a client account and a professional account can live on one phone number. The app switches between them (“Switch to your professional account”) without a new SMS.
- Email later. You can add an email address under “Settings → Account” as a second way to sign in and as a recovery route. It has to be confirmed via a link before it counts for anything.
Professional accounts register with a phone number. Sign in with email once you add one in settings.
3. The setup wizard — four steps
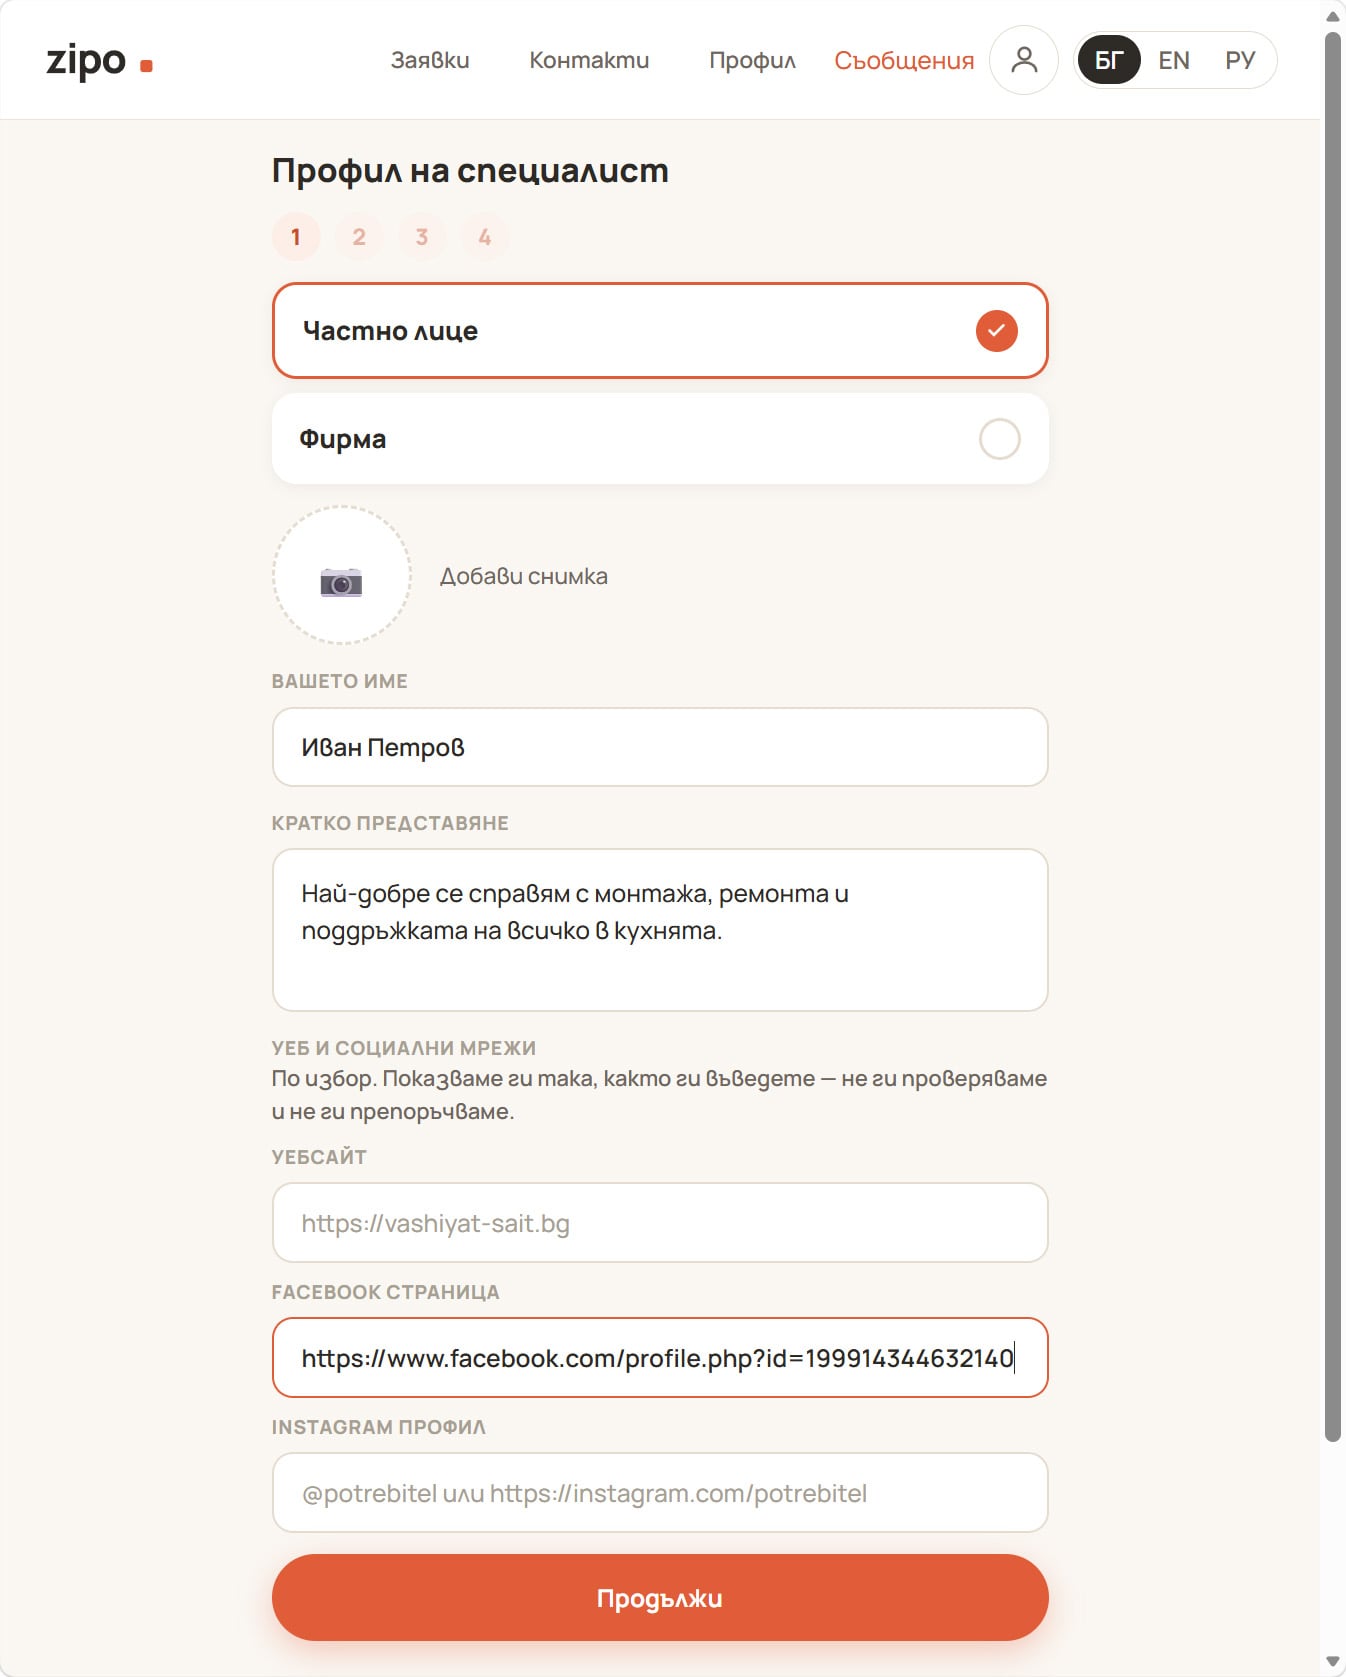
The wizard lives at /pro/onboarding, under the title “Specialist profile”.
The wizard is resumable. If you close it halfway, the next visit reopens it at the first step that is still missing data, with everything you already saved filled in. Once the account is matchable (see section 5) the wizard stops appearing and sends you to your dashboard instead.
Step 1 — Profile
| Field | Notes |
|---|---|
| Individual / Company | Pick this first — it changes the rest of the form. An individual gets a circular photo and a 10-service cap; a company gets a square logo tile, a 20-service cap and the company block. |
| Photo / Logo | Tap the photo tile. Images are downscaled and re-encoded to JPEG (max 1600 px, ≤2 MB) in your browser before upload; location data is stripped. |
| Your name / Trading name | Required. This is the name clients see everywhere. |
| Short introduction | Optional, up to 2000 characters. The first ~140 characters are what shows on your catalog card, so put your pitch first. |
| Legal name, UIC / Bulstat, Office address | Company only, all optional. An invalid UIC checksum is rejected at the field. These are shown as you declare them — Zipo does not verify them. |
| Website · Facebook page · Instagram profile | Optional, both account types. Validated as you type: the website must start with http:// or https://; the Facebook field accepts only a facebook.com address; the Instagram field accepts an instagram.com address or a bare @username, which is normalised to https://instagram.com/username and shown back to you. Max 500 characters each. |
The placeholder in the introduction field is a good starting point:
What you do, since when, what you're best at…
Press “Continue”.
Step 2 — Services
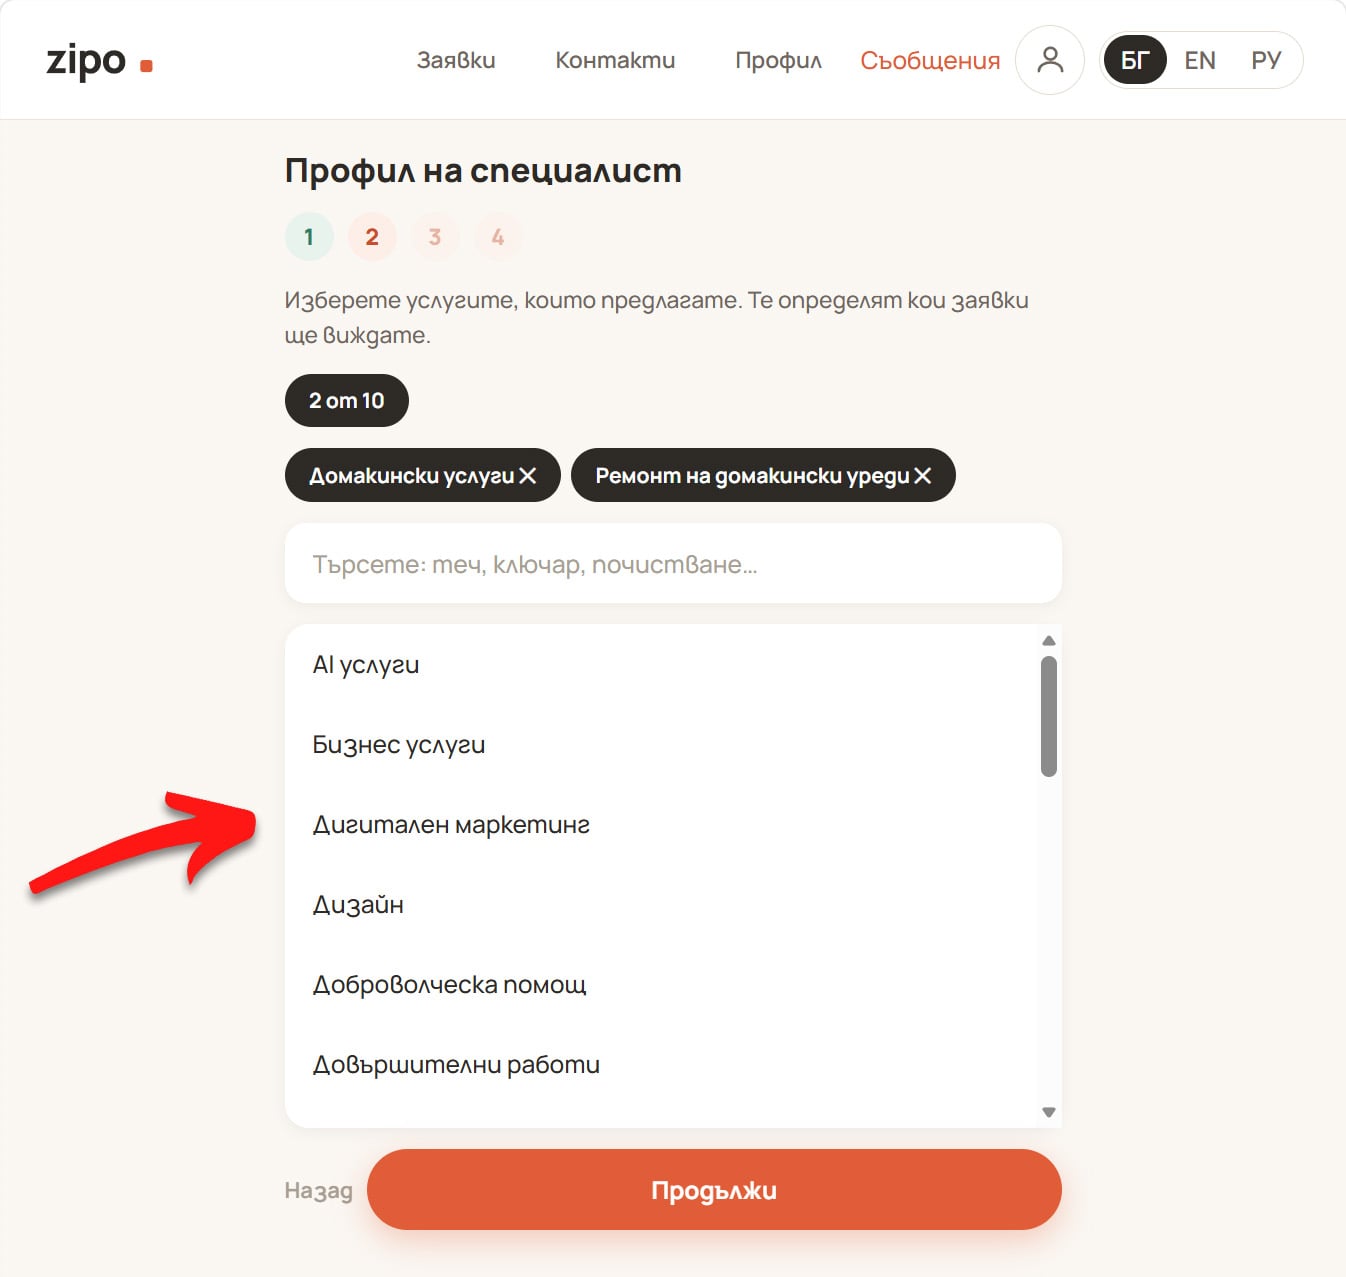
Pick the services you offer. They decide which requests you'll see.
- Search by name, or browse the list of groups.
- Tap an entry to add it; tap the ✕ on the chip to remove it.
- The counter shows “{count} of {cap}” — 10 for an individual, 20 for a company.
- You can pick at any level of the catalogue. Picking a whole group covers everything under it and counts as one service, but picking the concrete services you actually do ranks and converts better.
- At least one service is required to continue.
This choice is load-bearing: it decides which requests reach you, and price-list rows can only be attached to services you have picked here.
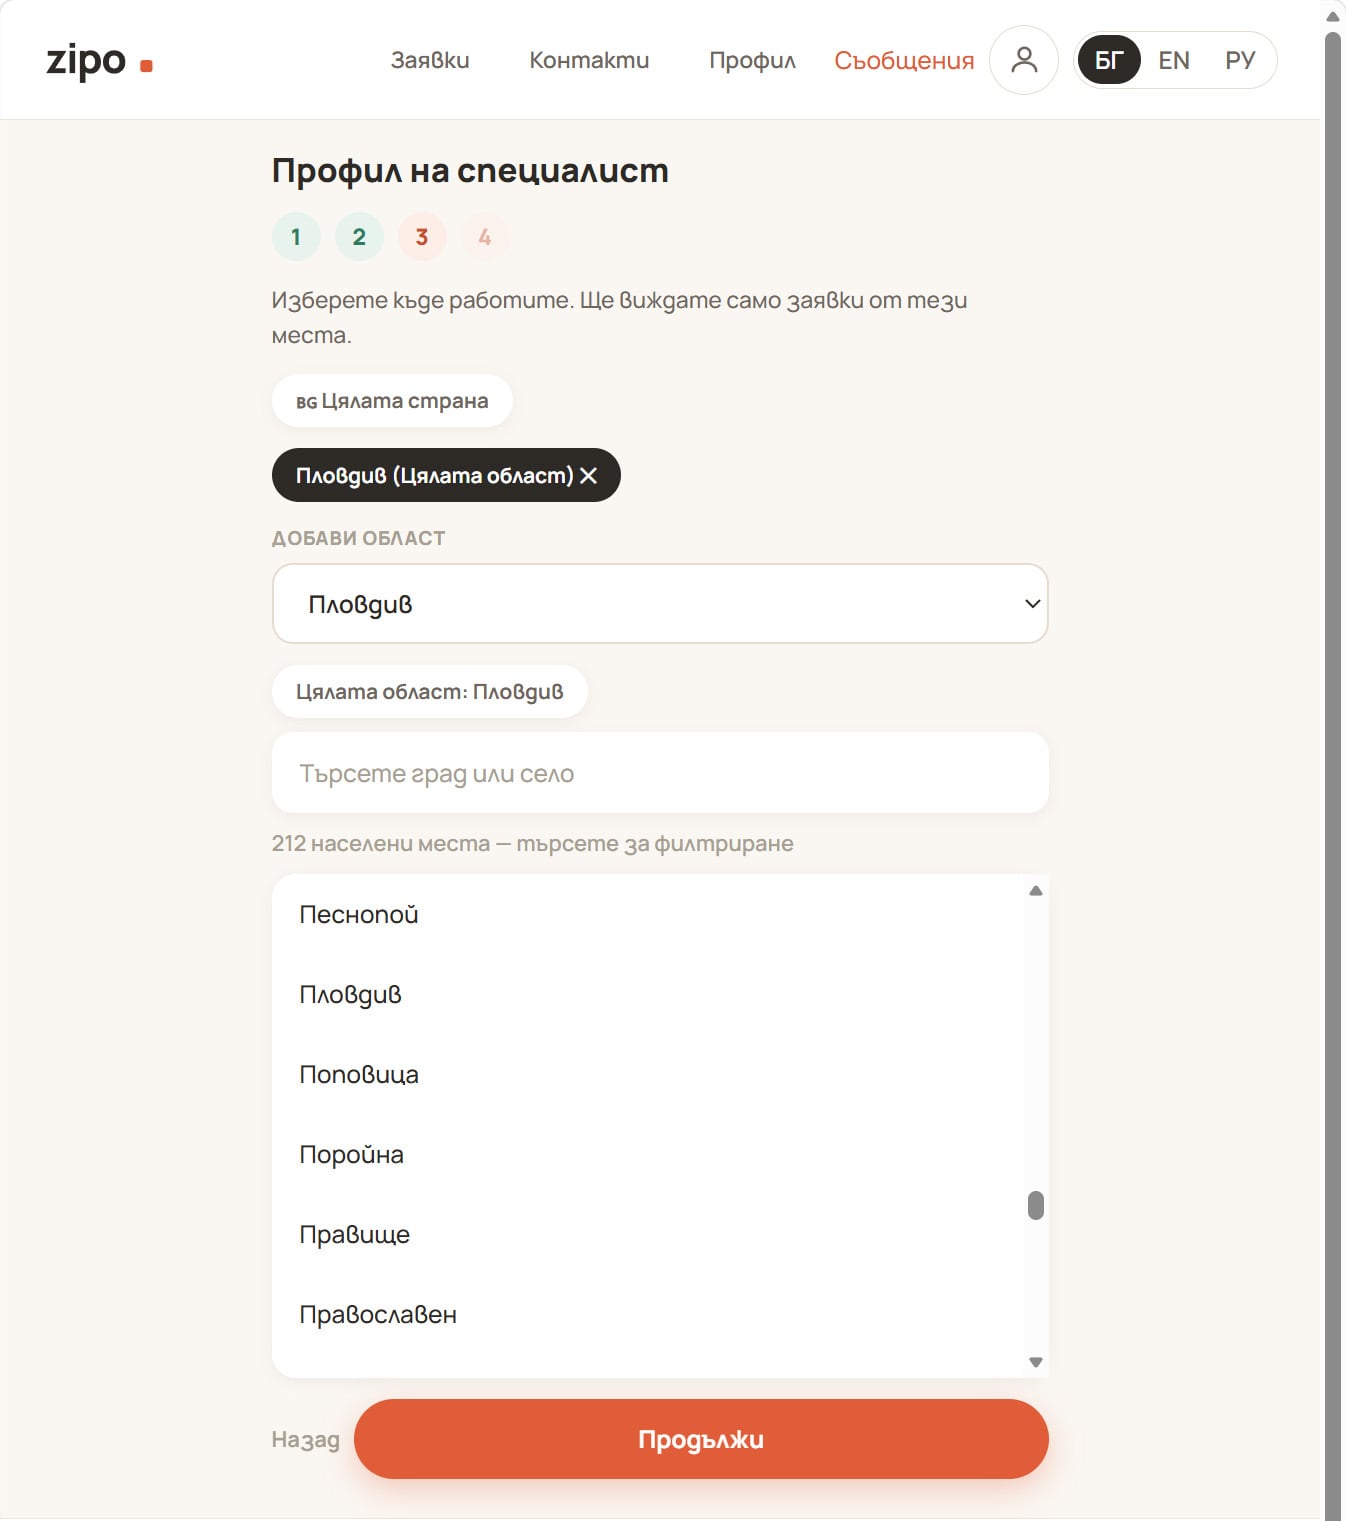
Step 3 — Areas
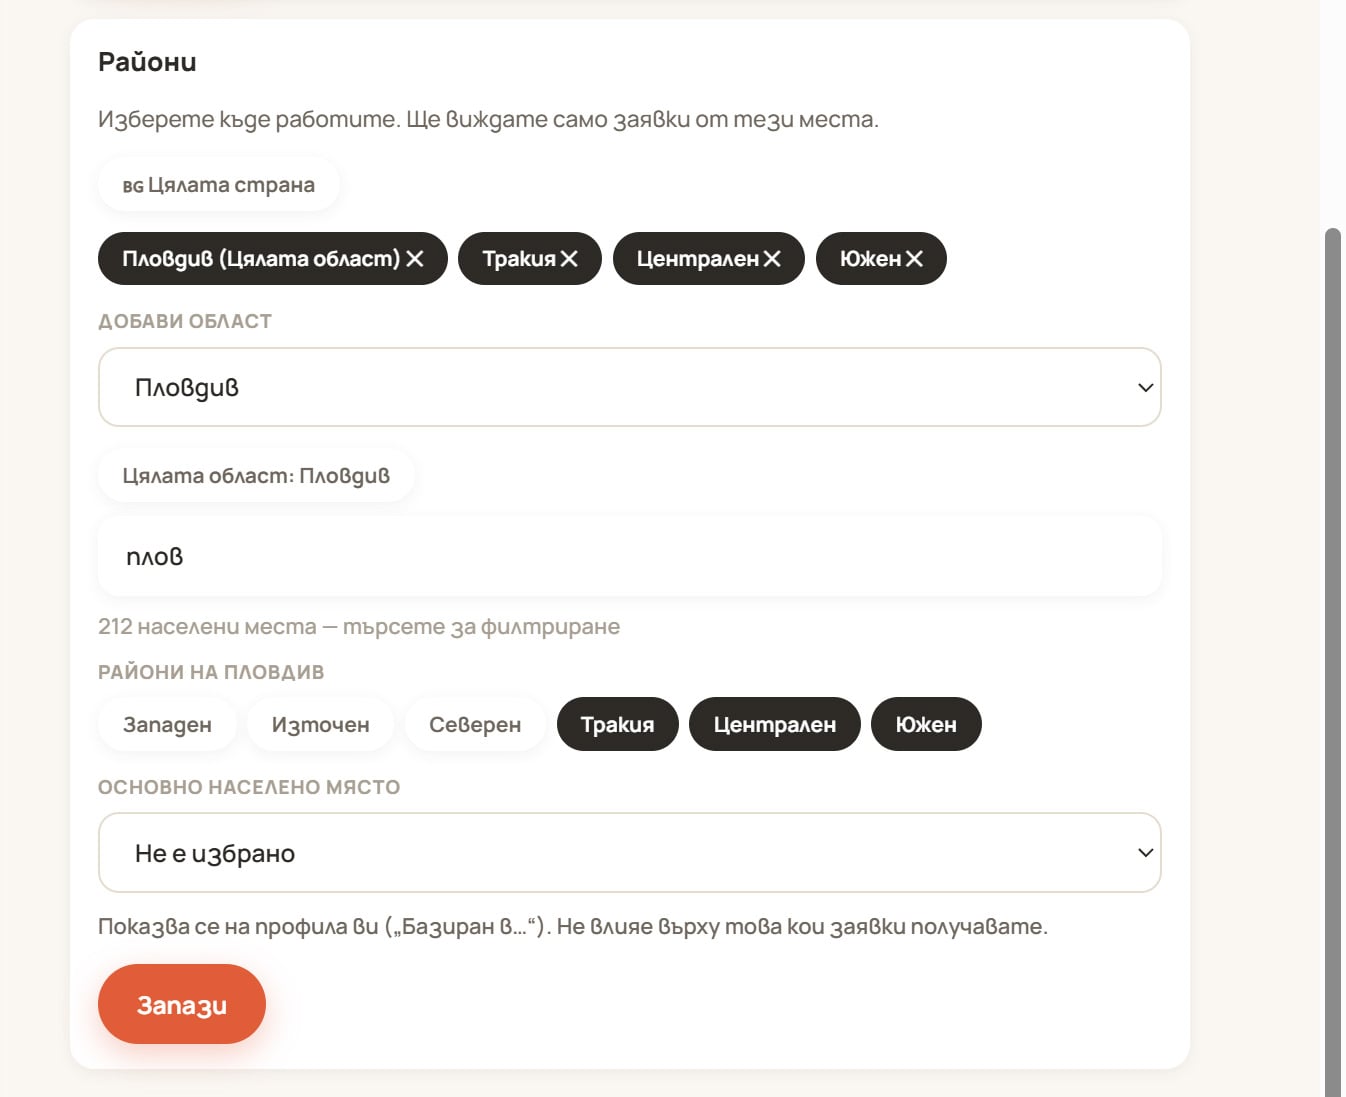
Pick where you work. You'll only see requests from these places.
- Tap a region to open its towns; the search box filters the list.
- Tap “Whole region” to cover a region entirely, or “Whole country” for nationwide.
- Inside Sofia, Plovdiv and Varna you can narrow a town down to individual districts. Picking districts replaces the whole-town coverage; removing the last district restores it.
- Selected coverage shows as removable chips grouped by region.
- At least one area is required to continue.
Coverage is normalised when saved: a town inside a whole region, or a district inside a whole town, is dropped as redundant. The list you see after saving is the list that is stored.
Zipo matches by place, not by distance. There is no radius, no map pin, and a client’s address is never attached to a request.
Step 4 — Price list (optional)
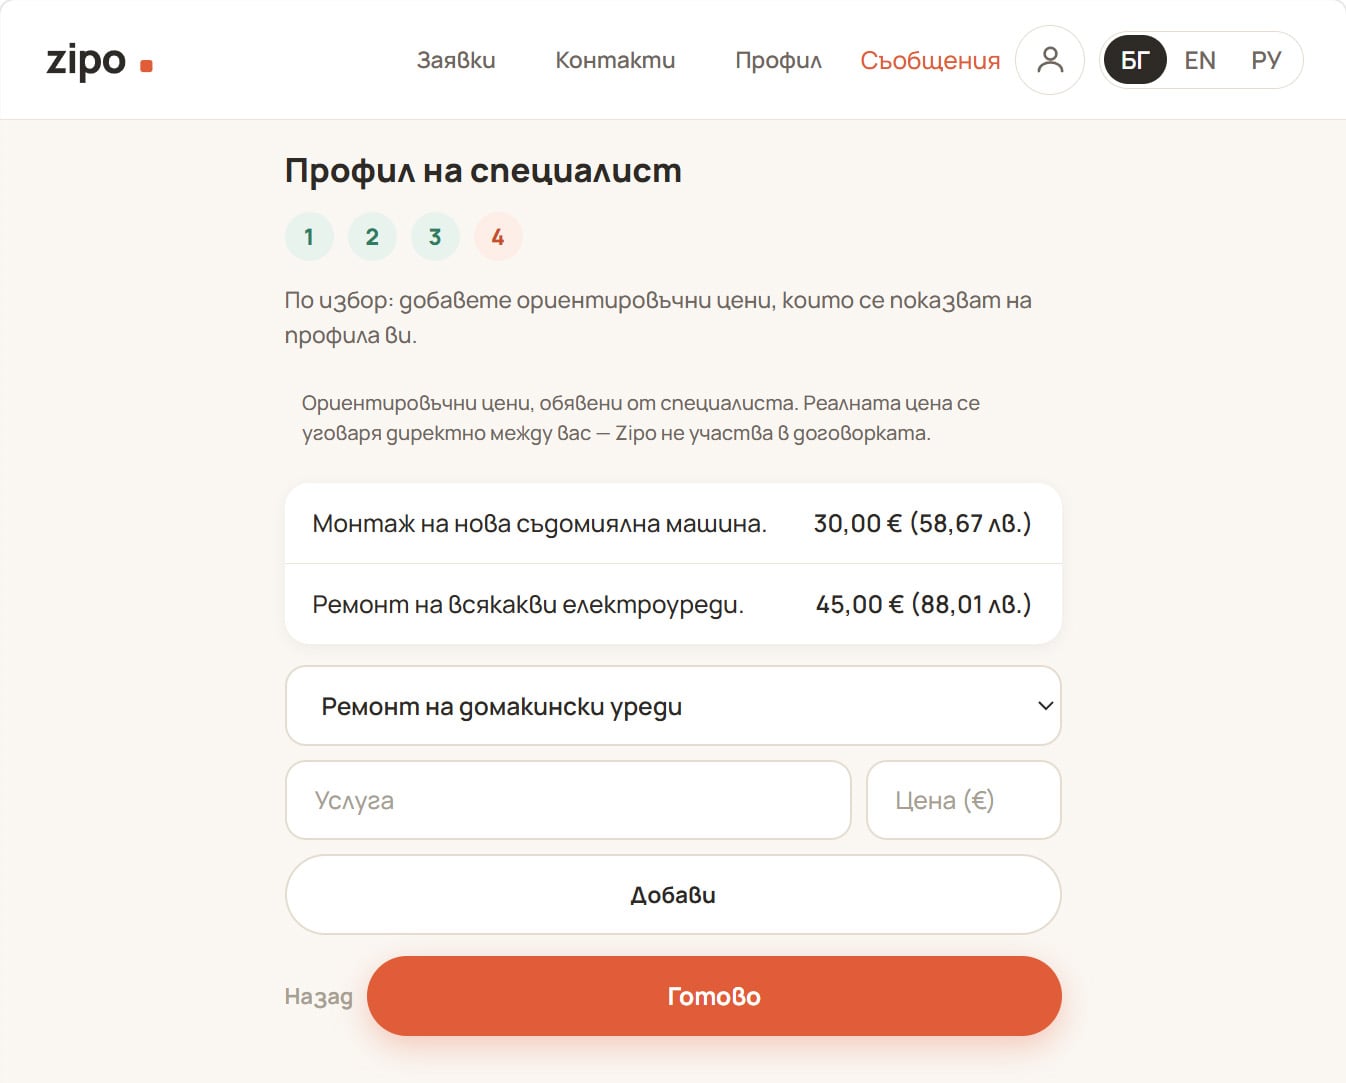
Optional: add reference prices shown on your profile.
Each row is: category (only from the services you picked in step 2) → service title → price (€). Press “Add”. Up to 30 rows.
A disclaimer sits above the list and stays visible to clients:
Reference prices published by the specialist. The actual price is agreed directly between you — Zipo takes no part in the arrangement.
Press “Done”. If you would rather come back to prices later, press “Done” with an empty list and use the “Price list” tab on your dashboard.
The finish screen
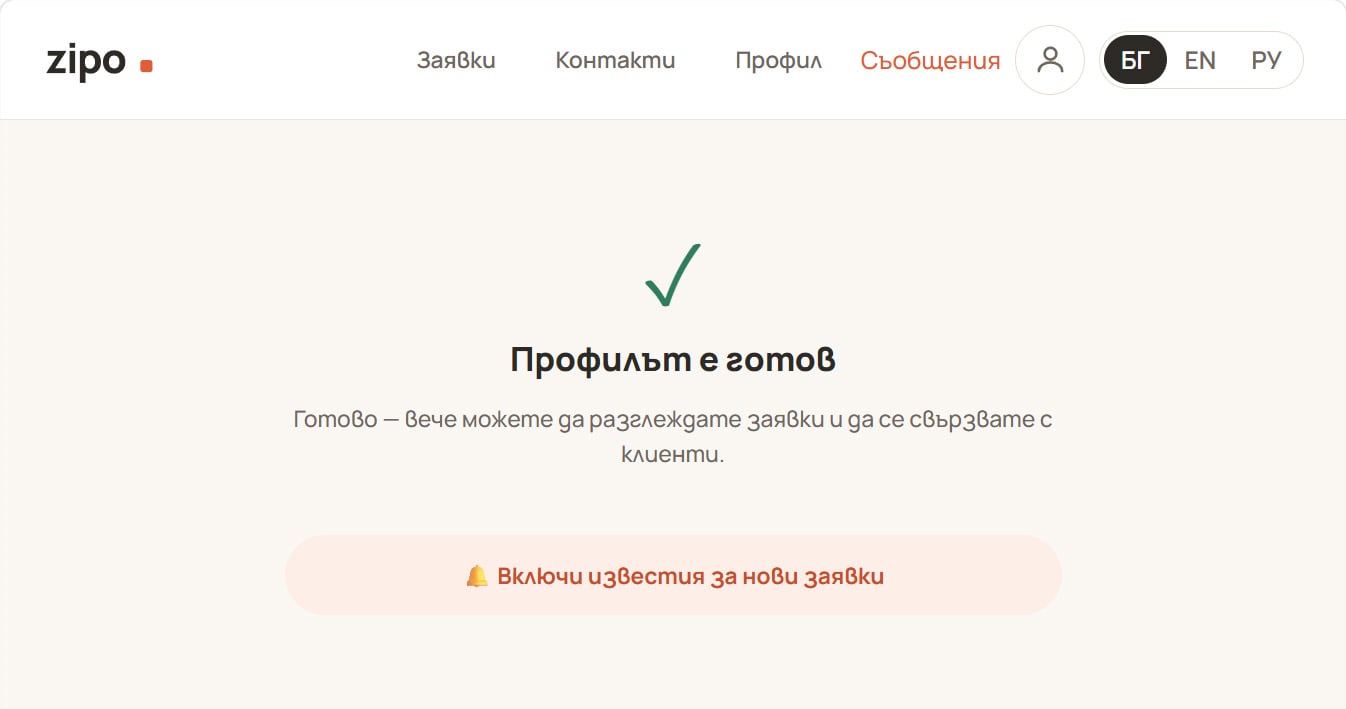
You're all set — you can now browse leads and contact clients.
- On Android and desktop: press “Turn on new-lead notifications” to allow push. This is the fastest channel — new matching requests arrive within seconds.
- On iPhone: notifications only work from the installed app. Follow the three illustrated steps: the Share button in Safari → “Add to Home Screen” → open Zipo from the home-screen icon, then enable notifications from there.
4. Your profile dashboard
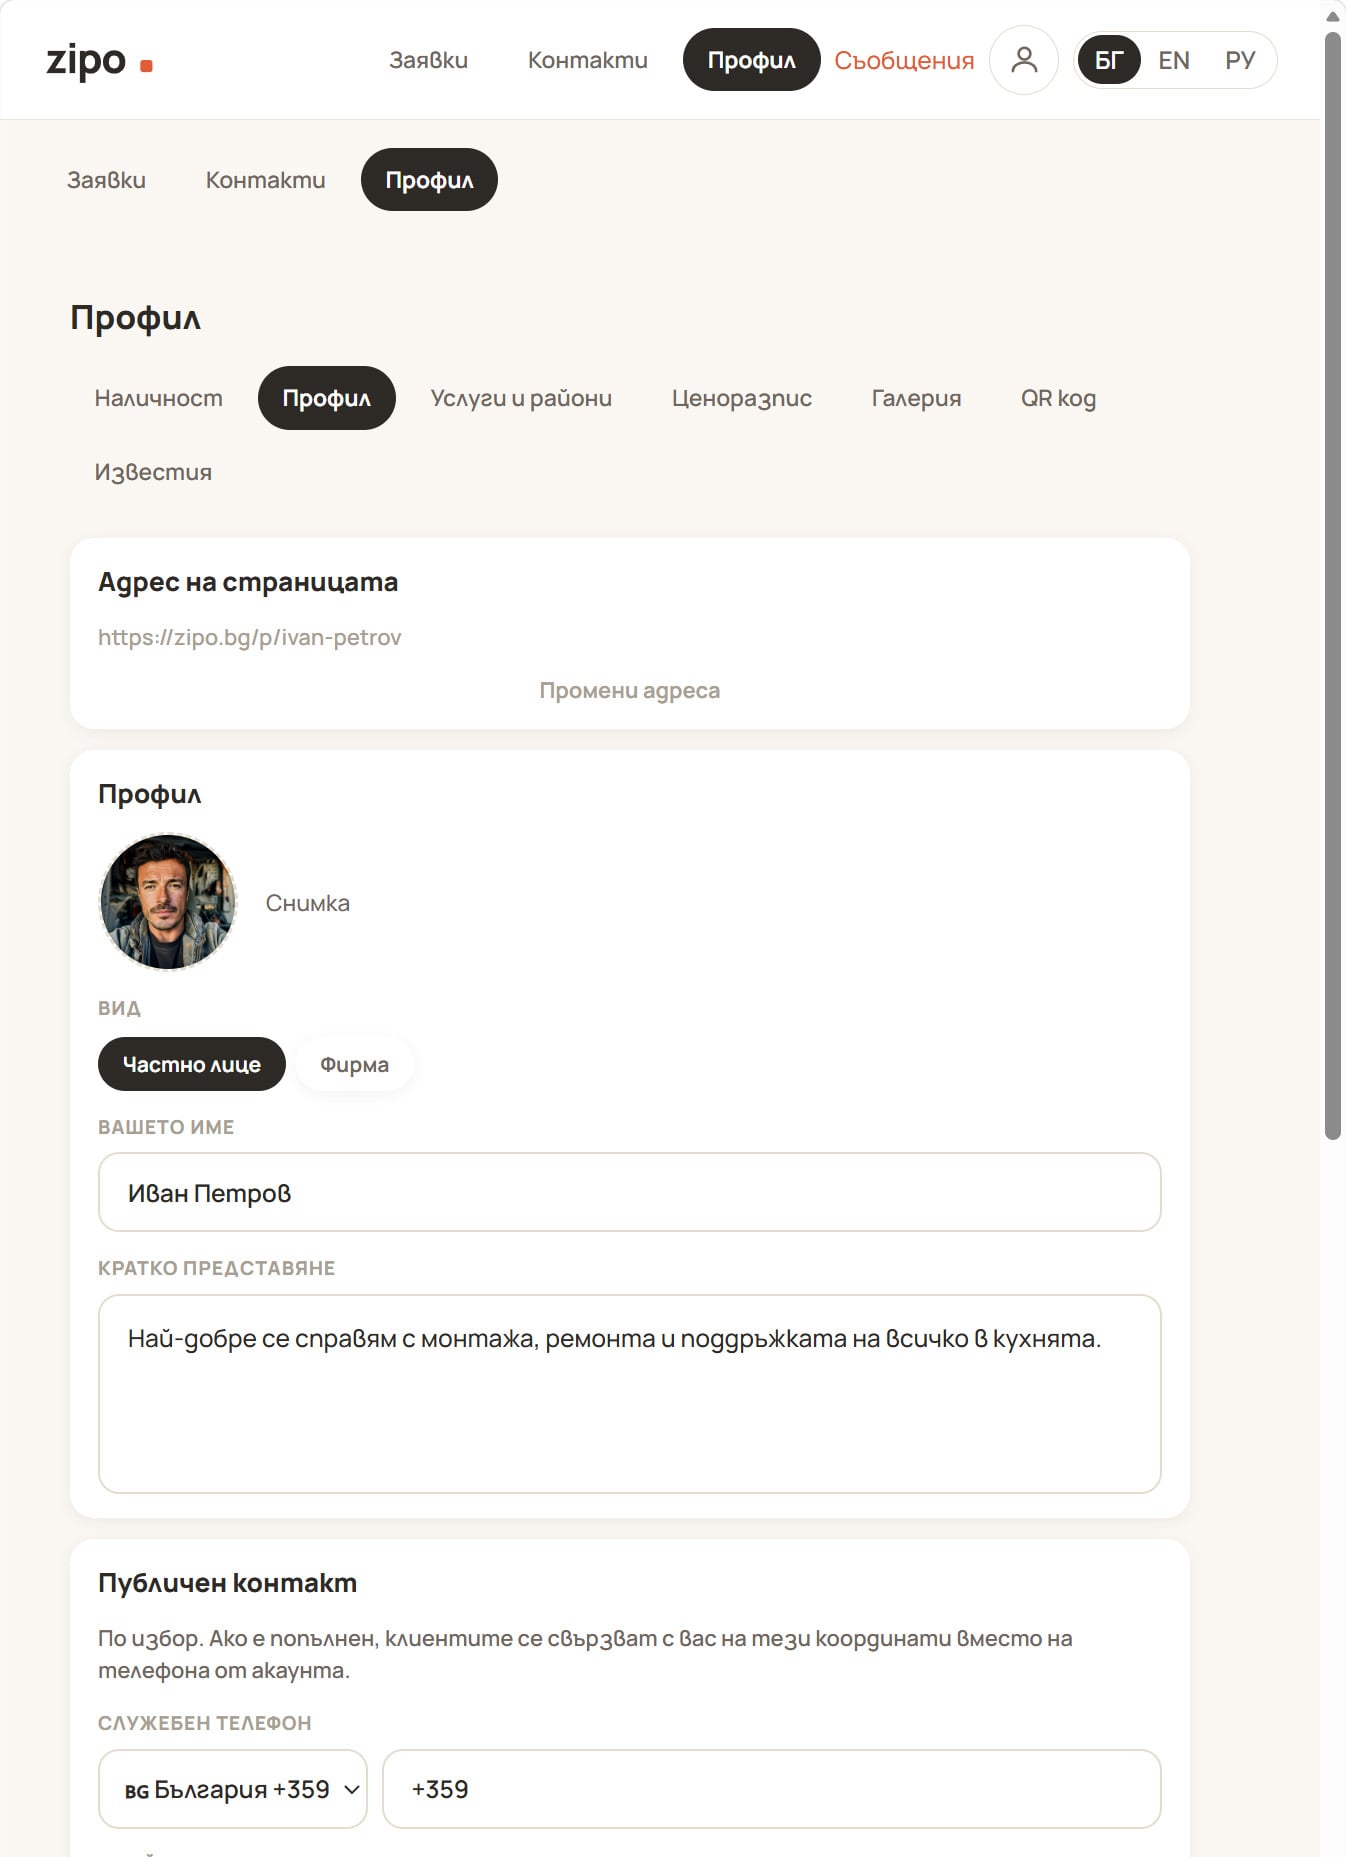
Your dashboard lives at /pro/profil and has seven tabs. The specialist navigation also holds “Requests” (your lead feed), “Contacts” (clients whose number you revealed) and “Profile”.
| Tab | What it holds |
|---|---|
| Availability — /pro/profil | Two independent switches |
| Profile — /pro/profil/redaktirane | Identity, bio, public contact, links, page address |
| Services and areas — /pro/profil/uslugi | Services, coverage, base town |
| Price list — /pro/profil/tsenorazpis | Hourly rate and per-service prices |
| Gallery — /pro/profil/galeriya | Up to 20 photos of your work |
| QR code — /pro/profil/qr | Your page address, QR image, printable card |
| Notifications — /pro/profil/izvestiya | Which services and areas notify you |
Each tab saves on its own. Saving one never overwrites another — you can edit the bio without touching your services.
4.1 Availability
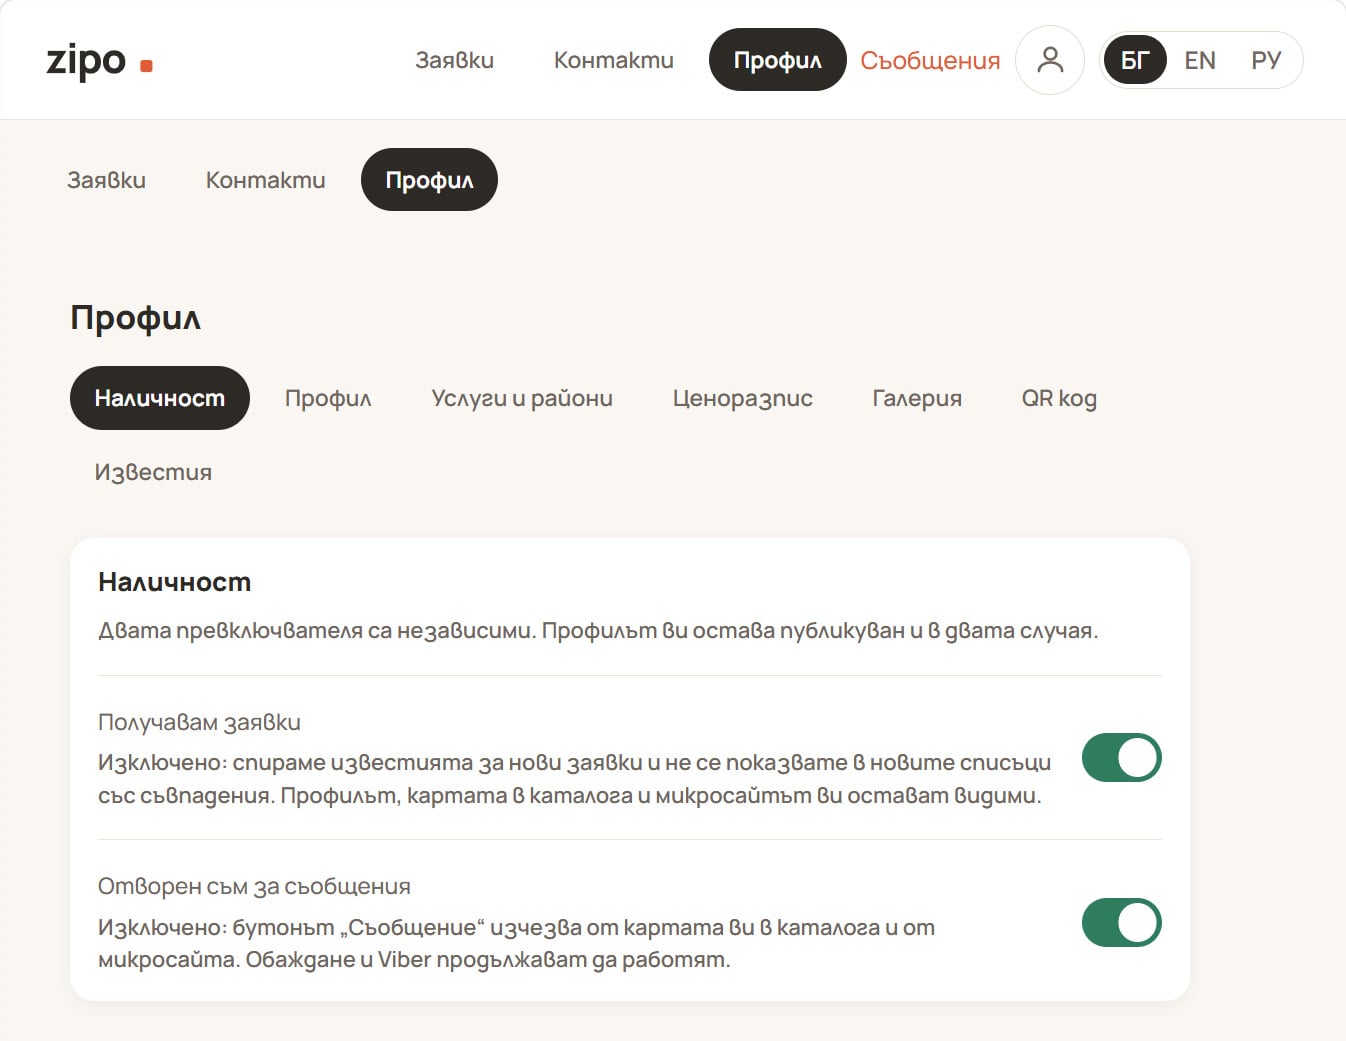
The two toggles are independent. Your profile stays published either way.
| Switch | Off means |
|---|---|
| Receiving requests | We stop notifying you about new requests and you drop out of new match lists. Your profile, catalog card and public page stay visible. |
| Open to messages | The Message button disappears from your catalog card and public page. Call and Viber keep working. |
A busy specialist typically turns the first off and leaves the second on; someone drowning in chat does the reverse. There is no “busy until {date}” — Zipo does no scheduling — and nothing ever asks why you switched something off.
4.2 Profile
Everything from wizard step 1, plus three things the wizard does not have.
Public contact. Separate details for clients, if you would rather not use your account phone:
Optional. When set, clients reach you on these details instead of your account phone.
- Business phone — used for the Call and Viber buttons when set.
- Email for clients — shown on your public page. This is not your Zipo notification address; that one lives in Settings.
- Show the phone on my profile — off means the number is not printed on the page, but clients can still reach you with the call and Viber buttons.
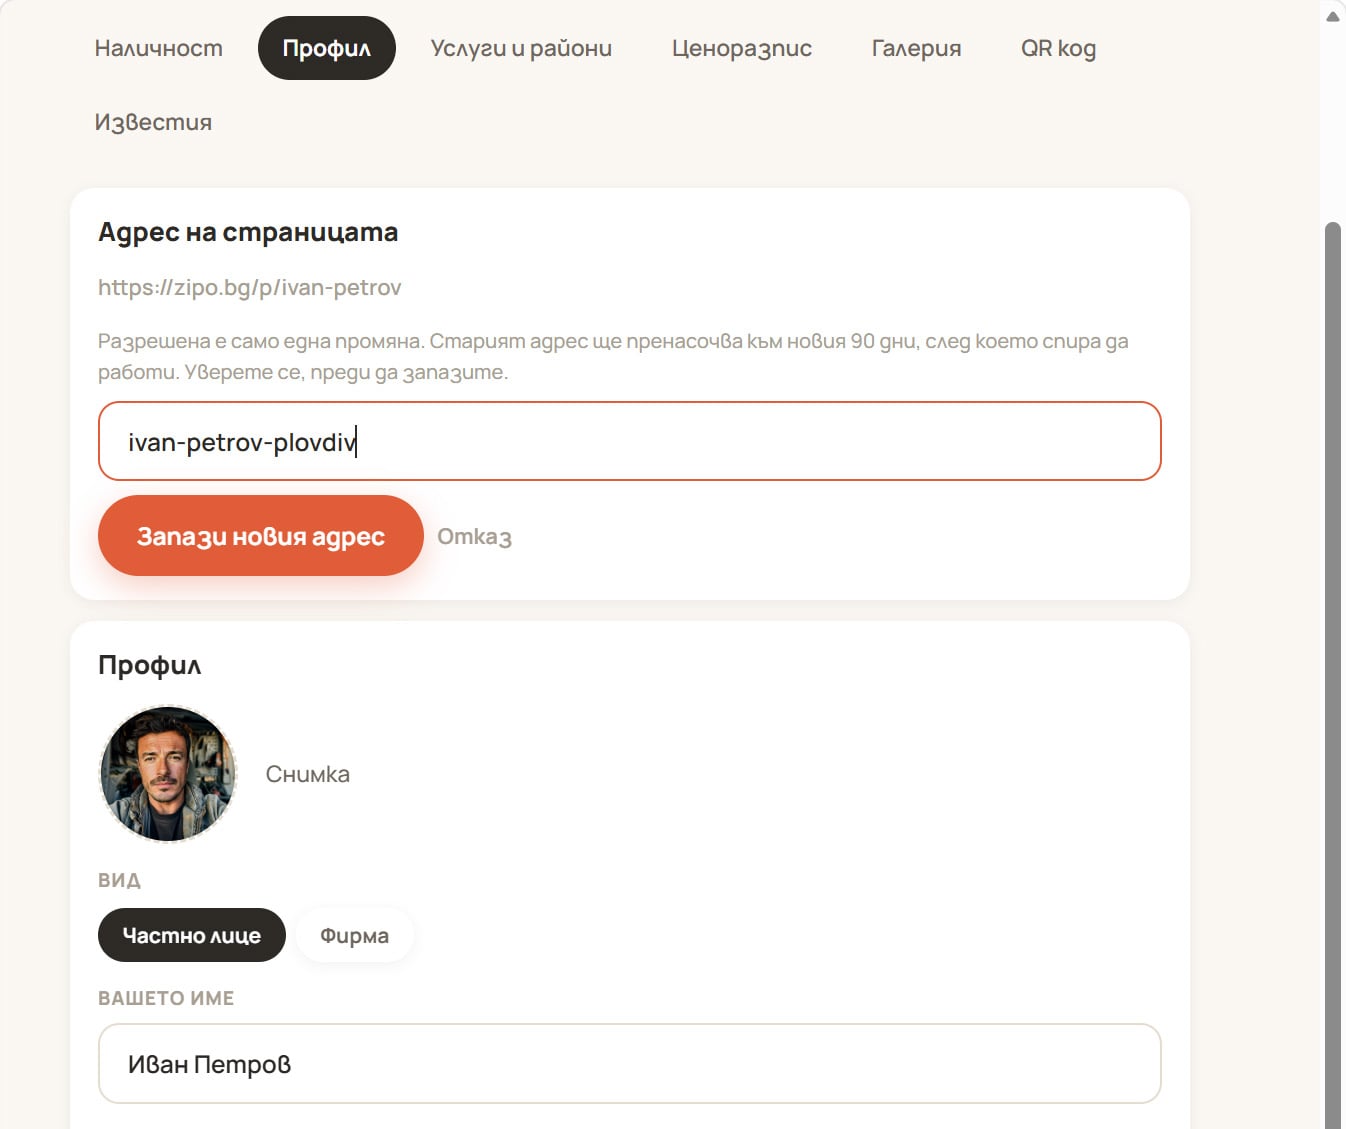
Page address. The address of your public page, zipo.bg/p/your-name.
One change, ever. The card warns you before saving:
Only one change is allowed. The old address redirects to the new one for 90 days, then stops working. Be sure before you save.
After that the control disappears. Letters, numbers and hyphens only. If you have printed business cards or stickers with the old address, change it before you print, not after.
Account type. You can switch between Individual and Company here. Downgrading a company to an individual clears the company block, and if you hold more services than the individual cap allows the save is refused with an explicit count — remove the extra ones in “Services and areas” first.
4.3 Services and areas
The same two editors as the wizard, plus a banner explaining what you may change right now, and a base-town selector.
Base town. Chosen from the towns already in your coverage.
Shown on your profile ("Based in…"). It does not affect which requests you get.
The change budget. Adding services or areas is rate-limited to protect the request feed from being harvested. Removing is always free and instant. One of three banners appears above the editors:
| Banner | Meaning |
|---|---|
| “For the first 14 days you can change services and areas freely — until {date}.” | Your setup window. Fix your services and coverage as often as you like. |
| “Changes until {time} count as one — add anything you missed.” | You have just expanded. Everything you add within 24 h of that first change counts as the same change — so “I forgot tiling, added it an hour later” costs nothing extra. |
| “Next change possible on {date}. Removing services and areas is always free.” | You have used this period’s expansion. Additions wait until that date; write to support if you need it sooner. |
There are two save buttons, because these are two separate saves: one under “Services”, one under “Areas”. The coverage list redraws from what the server kept after normalisation.
4.4 Price list — hourly rate and per-service prices
Two blocks, two independent saves.
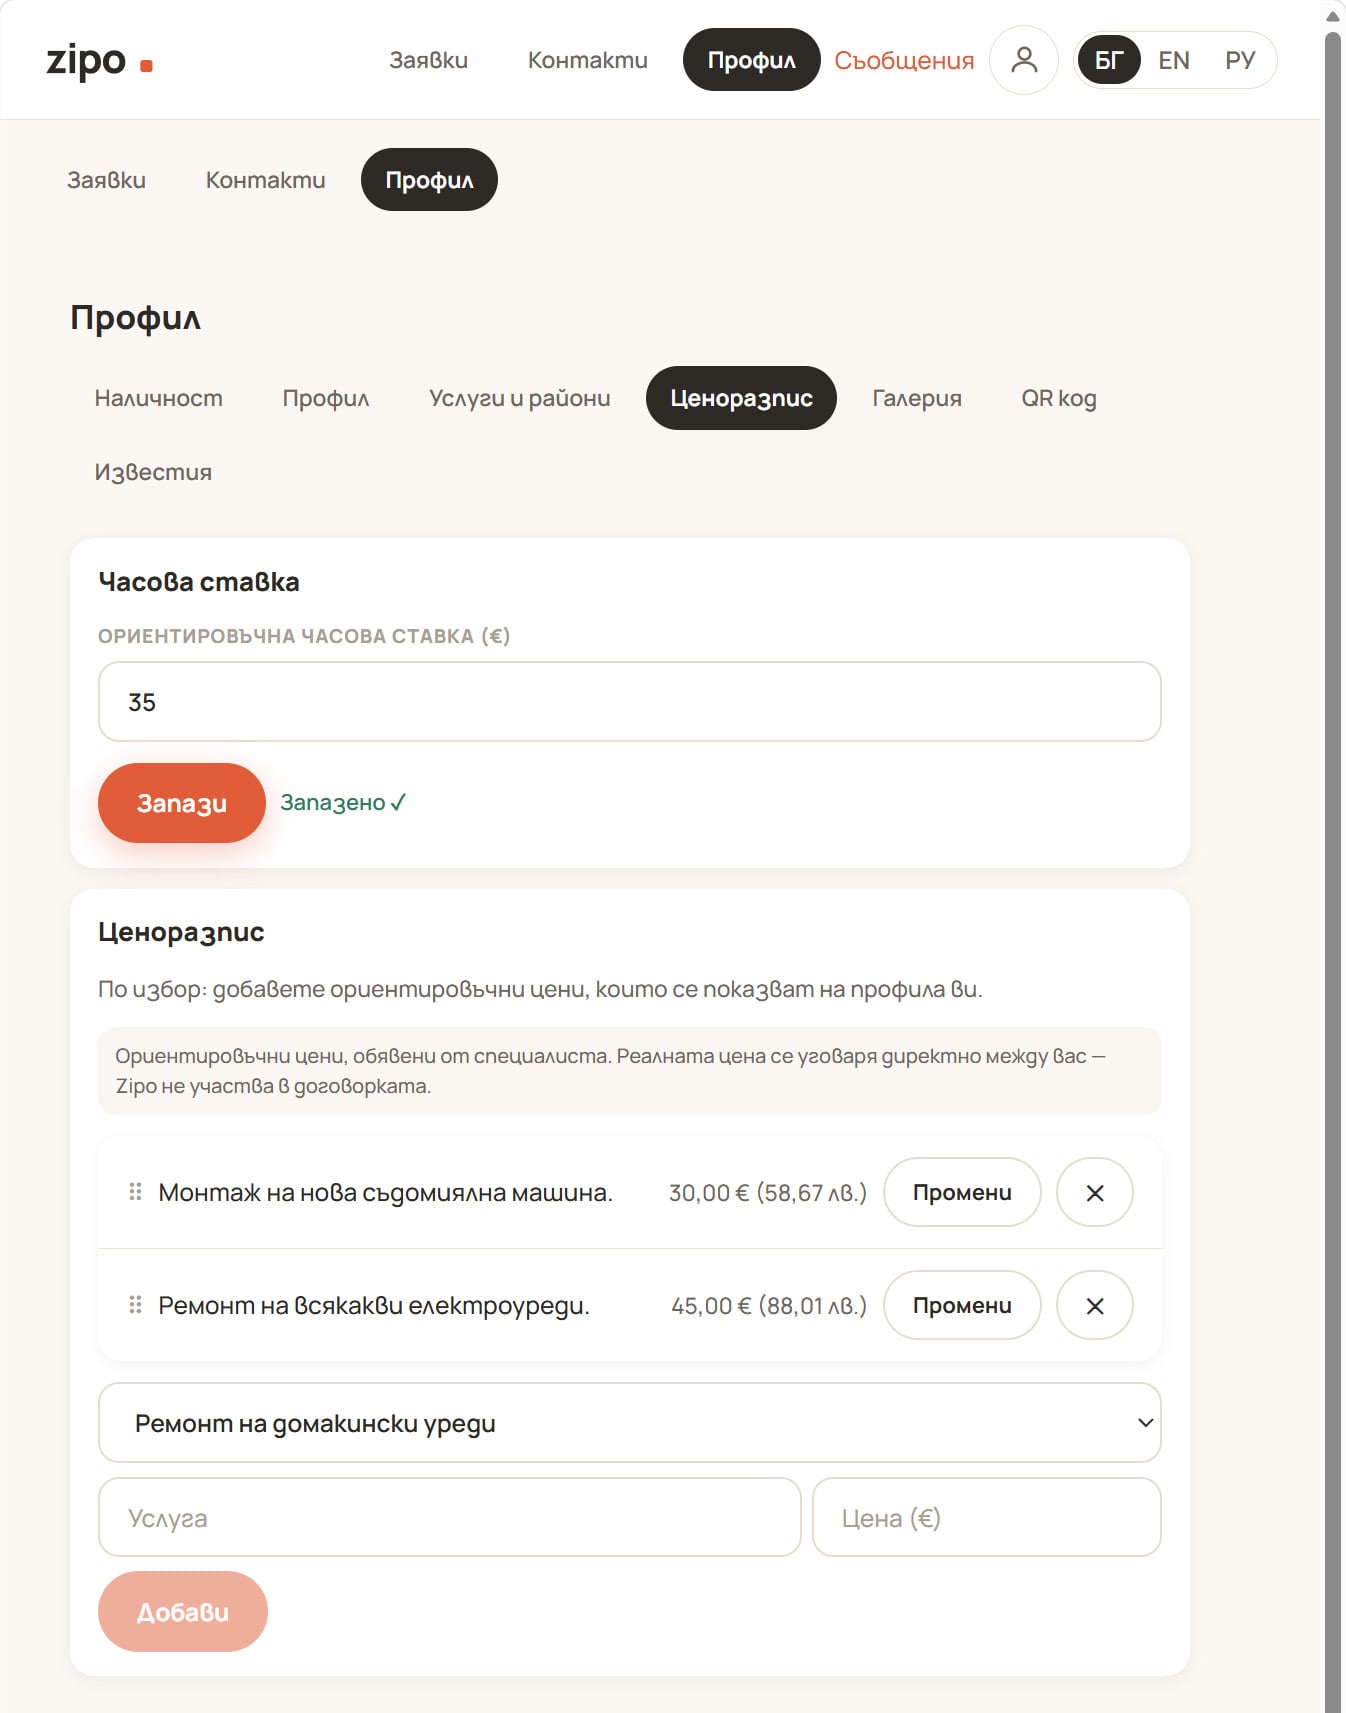
Hourly rate. A single figure in the “Reference hourly rate (€)” field, with the placeholder:
Optional — shown to clients as an estimate only
It accepts 30, 30.50 or 30,50. Press “Save”. Leave it empty if you do not work by the hour; the row simply does not render on your page.
Price list. The per-service prices, up to 30 rows.
- Add a row: pick the category (the dropdown lists only services you have picked in “Services and areas” — you cannot price a service you do not offer, and you cannot price a whole group), type the service name (max 120 characters) and the price (€), press “Add”.
- Edit a row: press “Edit”, change the fields, press “Save”.
- Delete a row: press the ✕.
- Reorder: drag the ⠿ handle. It also works from the keyboard — focus the handle and use the arrow keys. The order you set is the order clients see.
The disclaimer above the list is fixed and always visible. Clients see prices as plain content: there is no per-row button, no total, no basket, no calculator. A price on Zipo is an advertisement, exactly like a price in a newspaper ad — what you finally agree with the client is between the two of you, and Zipo never learns it.
Write your rows the way clients search. “Replace a mixer tap — 45 €” is both clearer than “Plumbing work” and the phrase people actually type into Google, which is how your page gets found.
4.5 Gallery — photos of your work
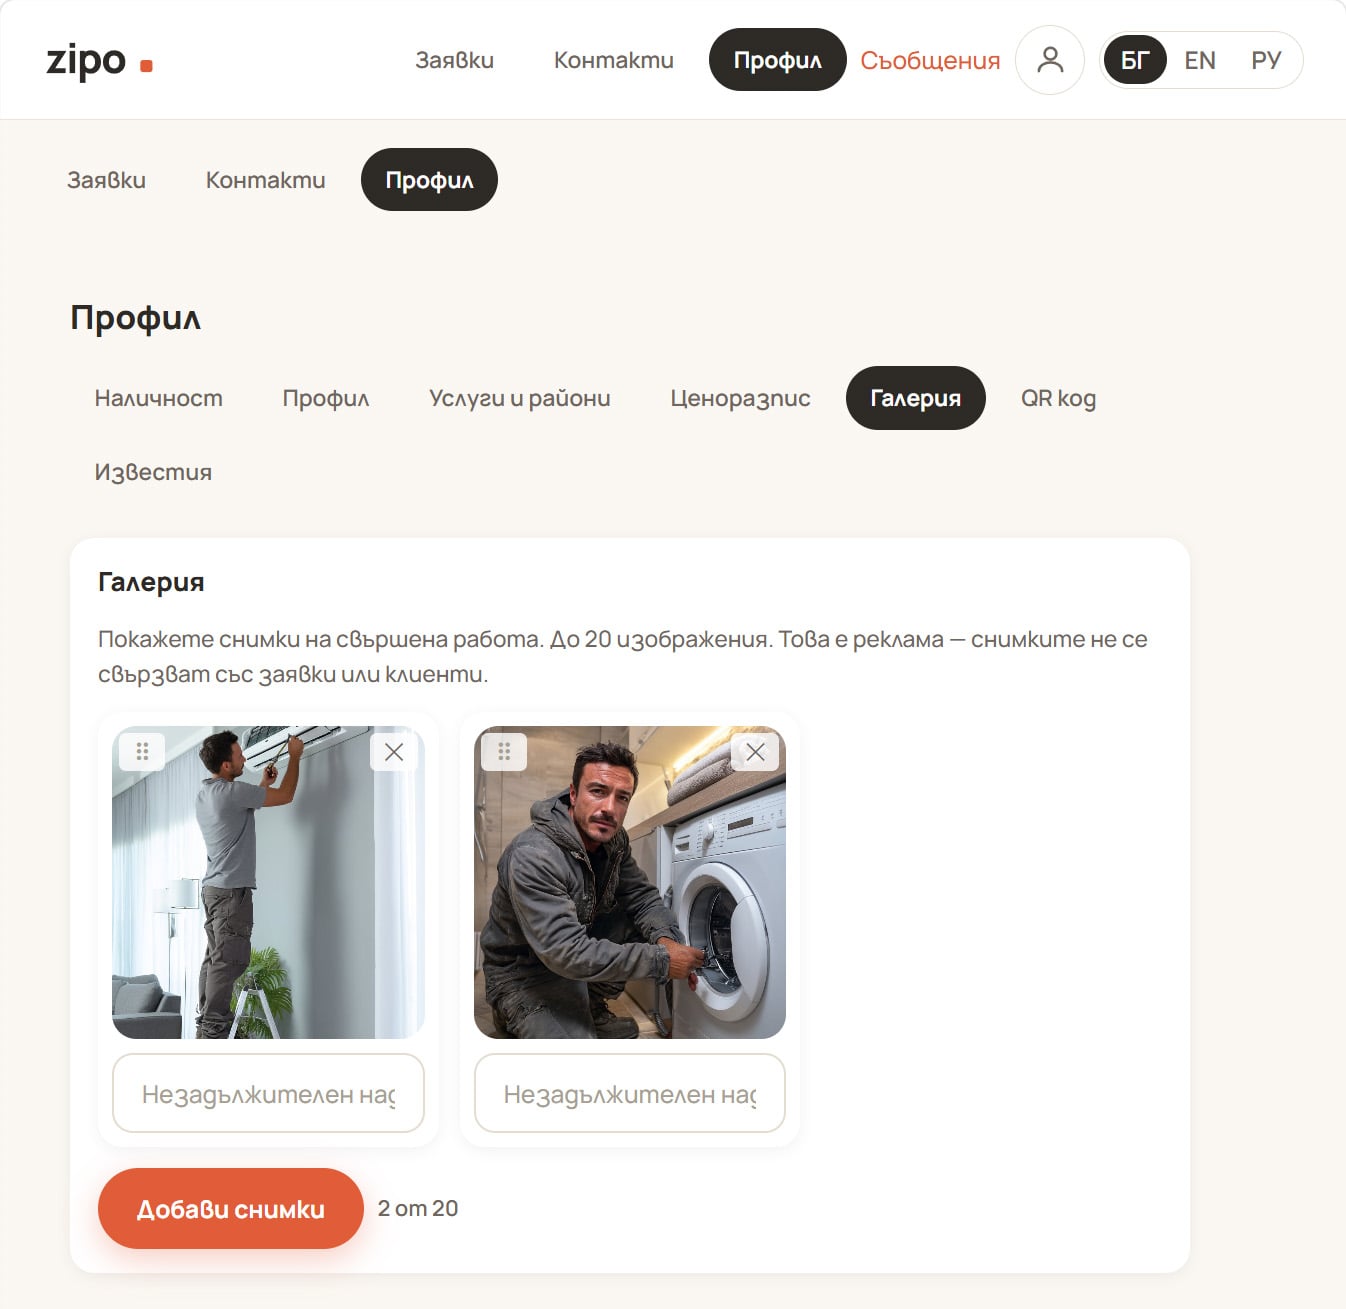
Show photos of your work. Up to 20 images. This is advertising — photos are never linked to requests or clients.
- Add photos — pick one or several files at once; they upload one after another. Each image is downscaled to max 1600 px and re-encoded to JPEG under 2 MB in your browser, and location data is stripped before upload.
- Caption — optional, max 200 characters, saved per image.
- Reorder — drag a tile. The first image is the one that carries the page.
- Delete — the ✕ on the tile. Public access ends within 24 hours.
The counter shows “{n} of 20”; the 21st upload is refused.
Photos of finished work are the single most persuasive thing on a specialist’s page. Shoot in daylight, show the result rather than the tools, and caption what it is.
Nothing in the app ever offers to “add photos from this job” — the gallery is a portfolio, edited here and nowhere else.
4.6 QR code
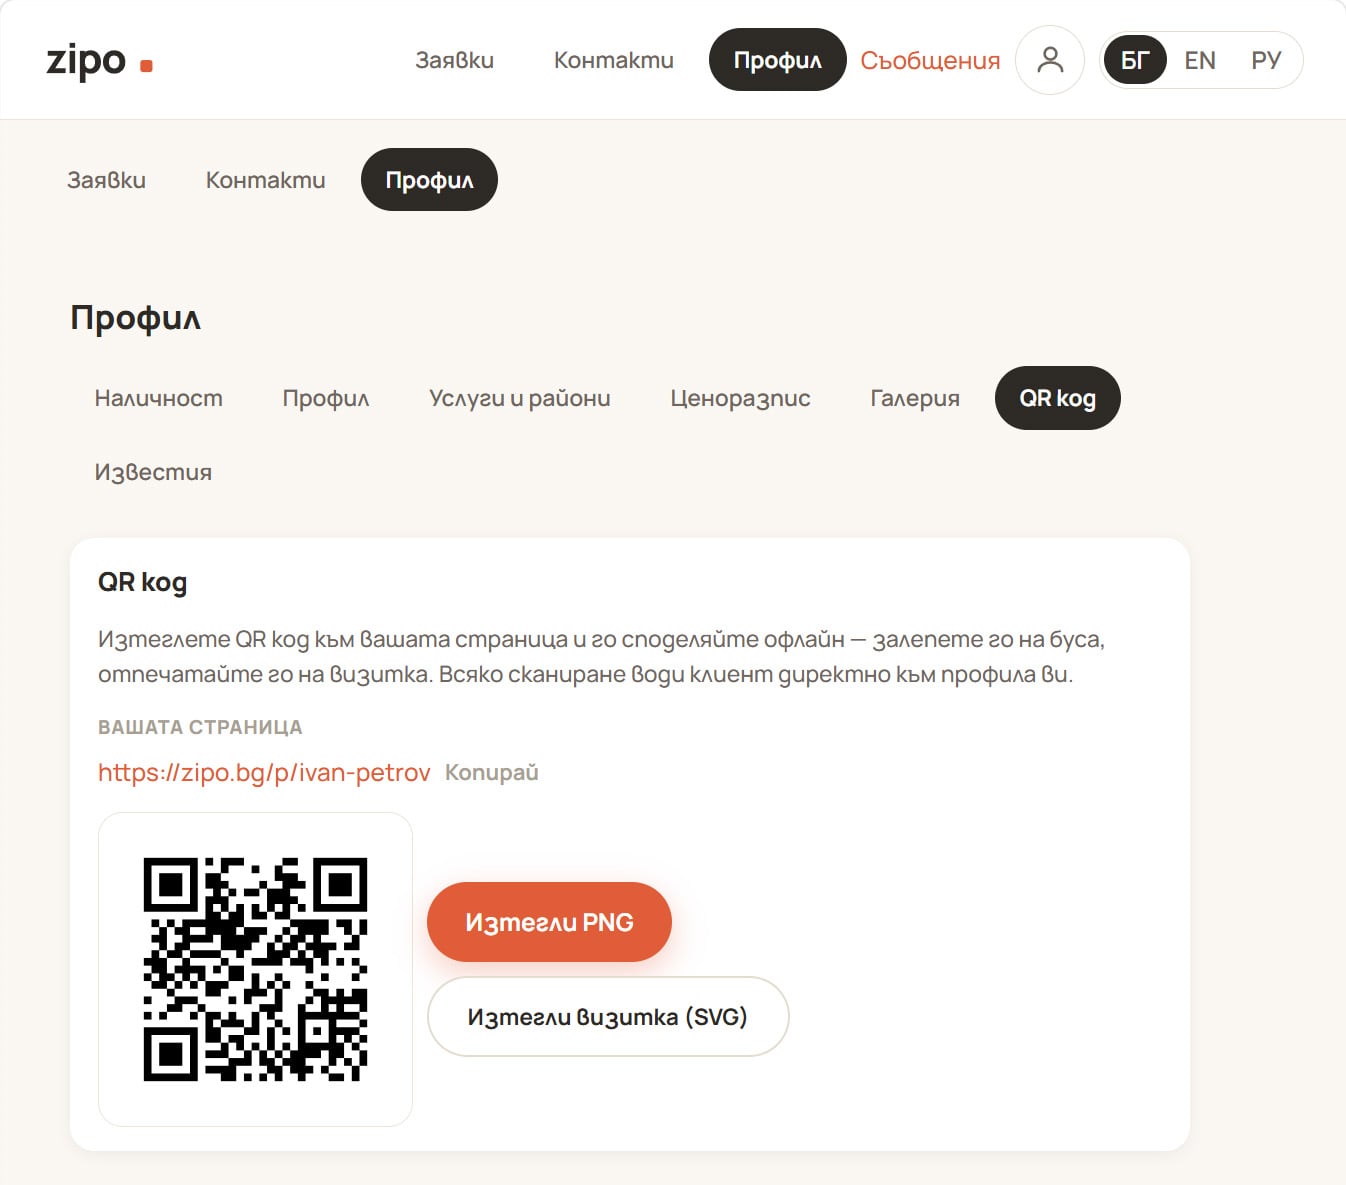
Download a QR code for your page and share it offline — sticker it on your van, print it on a business card. Every scan takes a client straight to your profile.
- Your page — the full address, with a “Copy” button.
- Download PNG — the plain QR image, for stickers, adverts and social posts.
- Download business card (SVG) — a print-ready card, scalable to any size without blurring.
If the tab shows the message below, go to the Profile tab and save it once; the address is generated from your display name.
Fill in and save your profile first — then we'll generate your page address and its QR code.
4.7 Notifications
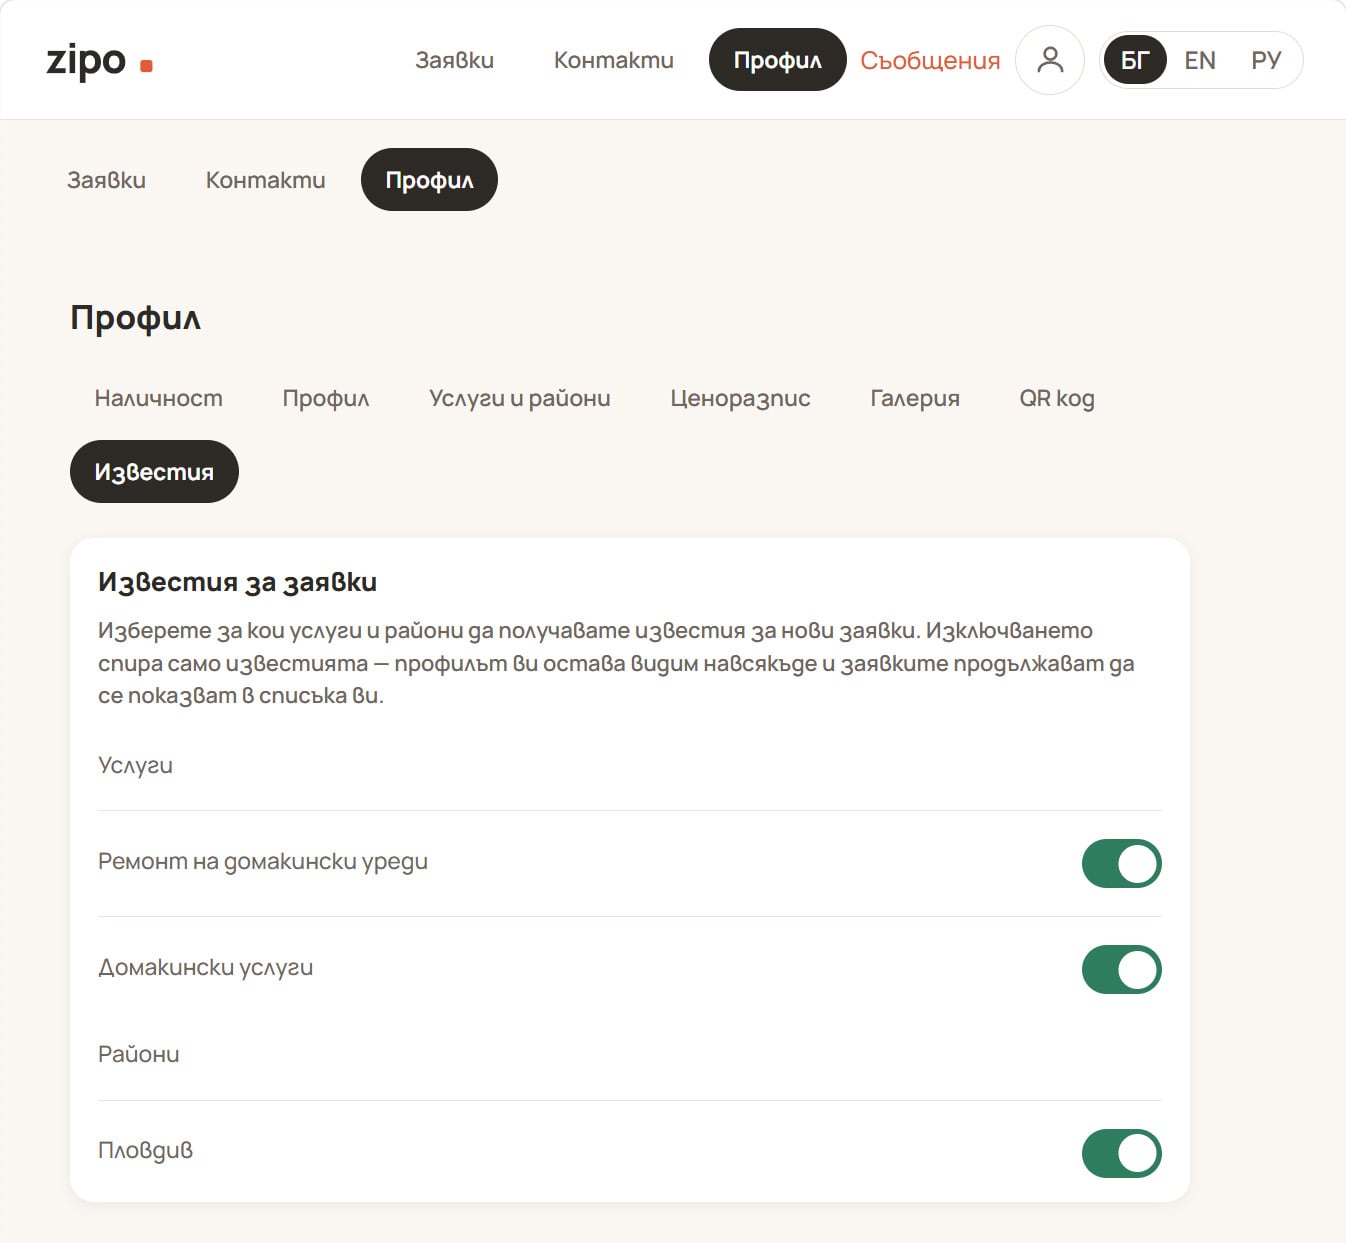
Choose which services and areas you get new-lead notifications for. Turning one off stops the notifications only — your profile stays visible everywhere and the leads still appear in your feed.
One switch per service you offer and one per area you cover. Use it for tuning, not for hiding: a specialist covering all of Sofia can mute everything but Lyulin and Mladost during a busy month and stay discoverable across the whole city.
This is separate from the two switches in section 4.1, and separate again from “Settings → Notifications”, where the email channel lives.
5. When is the account “complete”?
Zipo treats an account as matchable — that is, it starts receiving requests and appears in client match lists — when three things are true:
- a saved profile with a display name,
- at least one service, and
- at least one coverage area.
That is what wizard steps 1–3 deliver. Everything else raises how well the account performs.
Recommended completion checklist:
- Photo or logo uploaded
- Bio written, with the pitch in the first ~140 characters
- Services picked at the level you actually work at
- Coverage set, base town selected
- Company block filled in (companies) — it feeds ranking
- Website / Facebook / Instagram added if you have them
- Public phone and email set, and you have decided whether the phone shows
- Hourly rate and/or price-list rows added
- 5–20 photos of finished work with captions
- Page address checked (remember: one change only)
- QR downloaded and put somewhere physical
- Push notifications enabled — on iPhone, from the installed app
- Both availability switches on
6. Limits at a glance
| Item | Limit |
|---|---|
| Services (individual) | 10 |
| Services (company) | 20 |
| Price-list rows | 30 |
| Price-list row title | 120 characters |
| Gallery images | 20 |
| Image caption | 200 characters |
| Bio | 2000 characters |
| Web/social link | 500 characters each |
| Business address | 300 characters |
| Any uploaded image | ≤2 MB, max 1600 px after in-browser compression |
| Page address changes | 1, with a 90-day redirect from the old one |
| Adding services/areas | 1 expansion per 7 days, free for the first 14 days, 24 h amendment window per expansion |
Caps on services can be raised per account through support if you genuinely run a multi-trade firm — the message below is an invitation, not a wall:
You have reached the maximum of {cap} services. Write to us if you need more.
7. Published text goes through an automated filter
Your bio, price-list titles, gallery captions and links are published advertising, and every edit passes an automated content filter before it goes live. If something is held, a dialog explains which rule matched, states whether the decision was automated or made by a person, and offers an appeal. The rest of your save still lands; only the held field reverts.
Contact details inside your own bio or captions are fine — it is your advertisement.
Private chat is different: 1:1 messages are never filtered or analysed.
8. Identity verification and the shield badge
The shield badge means one specific thing: a person at Zipo compared a government ID against the account. It does not claim anything about qualifications, licences, insurance or the quality of the work, and for a company it covers the representative’s ID only — the company details on the page are self-declared.
At launch the badge is not required to use the account. There is no verification step in the wizard today, and an unverified account can browse requests, reveal contacts and appear in the catalog. The badge is granted by an administrator and is shown only for accounts that actually passed that check.
9. What Zipo never asks you
Worth knowing, because it explains several deliberate absences:
- Nobody will ever ask whether a client became a customer, what you charged, or how the work ended. There is no “won/lost”, no status column in “Contacts”, no outcome survey and no “did you get the job?” email.
- Prices on your page are never joined to a request, never summed into a total, and never turned into a quote or an order.
- Once you have a client’s number, the conversation moves to your phone or Viber and Zipo stops being involved. That is the design, not a missing feature.
Zipo is a directory that helps people find each other. Everything after the introduction is yours.
10. Troubleshooting
| Symptom | What is going on |
|---|---|
| “Professional accounts register with a phone number” | You used the email tab. Register with the phone number; add an email later in Settings. |
| The wizard reopens instead of the dashboard | One of the three matchable pieces is missing — profile, a service, or an area. The wizard opens at the missing step. |
| “Next change possible on {date}” | Your expansion for this period is used up. Removals still work immediately; contact support if the addition cannot wait. |
| “Pick a service you offer” on a price row | The category is not among your picked services, or it is a whole group. Add the service in “Services and areas” first. |
| The category dropdown on a price row is empty | You have no services picked yet. |
| The base-town dropdown is empty | It only lists towns already in your coverage. Add a town, save, then pick it. |
| “The image is too large” | The photo could not be compressed under 2 MB. Re-shoot at a lower resolution or crop it. |
| The QR tab says to fill in the profile first | Your page address has not been generated yet. Save the Profile tab once. |
| No push notifications on iPhone | iOS only delivers push to an installed app. Add Zipo to the Home Screen and enable notifications from there. |
| No new requests at all | Check that “Receiving requests” is on, that the Notifications tab has not muted the relevant services or areas, and that your coverage really includes where the requests are coming from. |